Brave Little Belgium: First Play (Part Four)

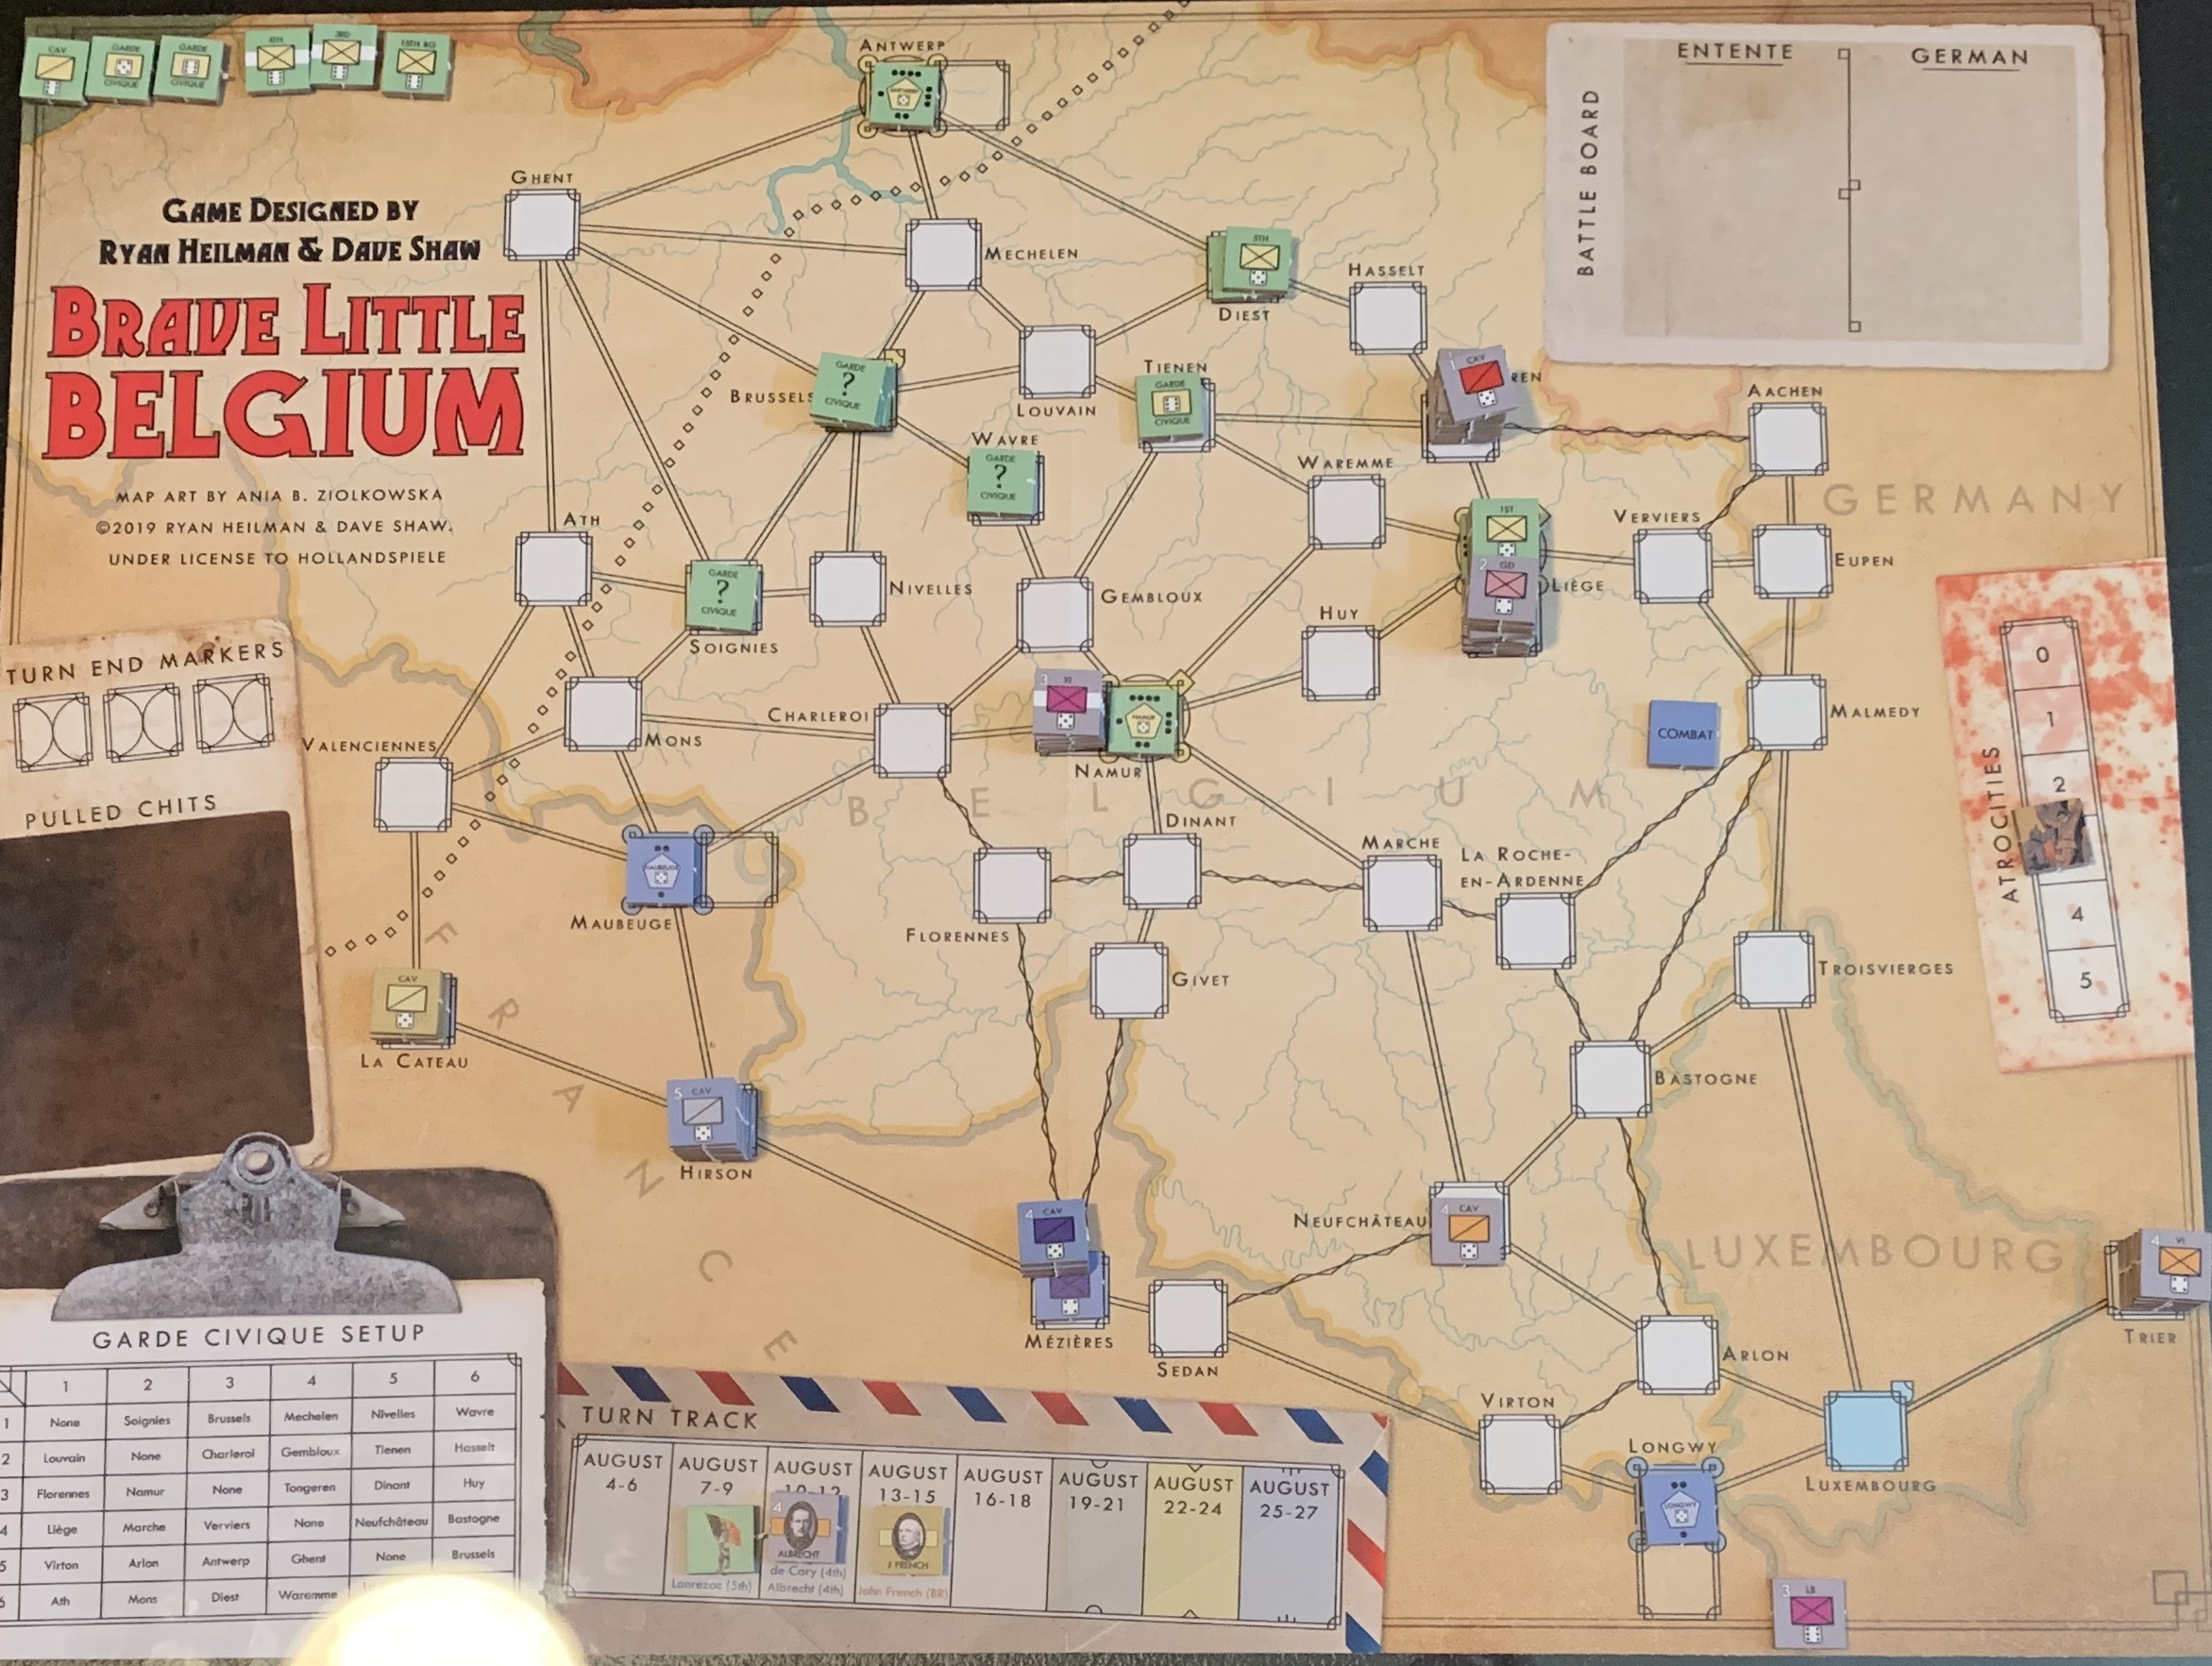
Turn Five, August 16-18

The first chit drawn on turn five was a Turn End chit. Two more of those, and it will be a great turn for the Entente. The next chit activated the BEF, which attacked the First Army in Ghent. Because the BEF is all stacked together, it gets +1 to its die rolls. (The rules do not have a note on this, but I assume it is because the British units were all part of a standing army, while the other powers have conscripts and reservists mixed in with their professional soldiers).

The First Battle of Ghent.

The British have 2 units attacking at 4 (rolling 6, 3; 2 hits with the BEF bonus) and 1 unit attacking at 5 (rolling a 2; zero hits). The German First Army fires back with 4 units at 4 (4, 2, 1, 1; 1 hit), 2 units at 5 (4, 1; 0 hits); and 2 units at 6 (1, 1; 0 hits). The BEF manages to push back the numerically superior First Army, reducing IV Corps (4 -> 5) and III Reserve Corps (5 -> 6). The British reduced their II Corps (4 -> 5). The German First Army retreated to Mechelen, and has been pushed out of the victory line.

The next chit was the entente forced march, followed by the Big Bertha chit.

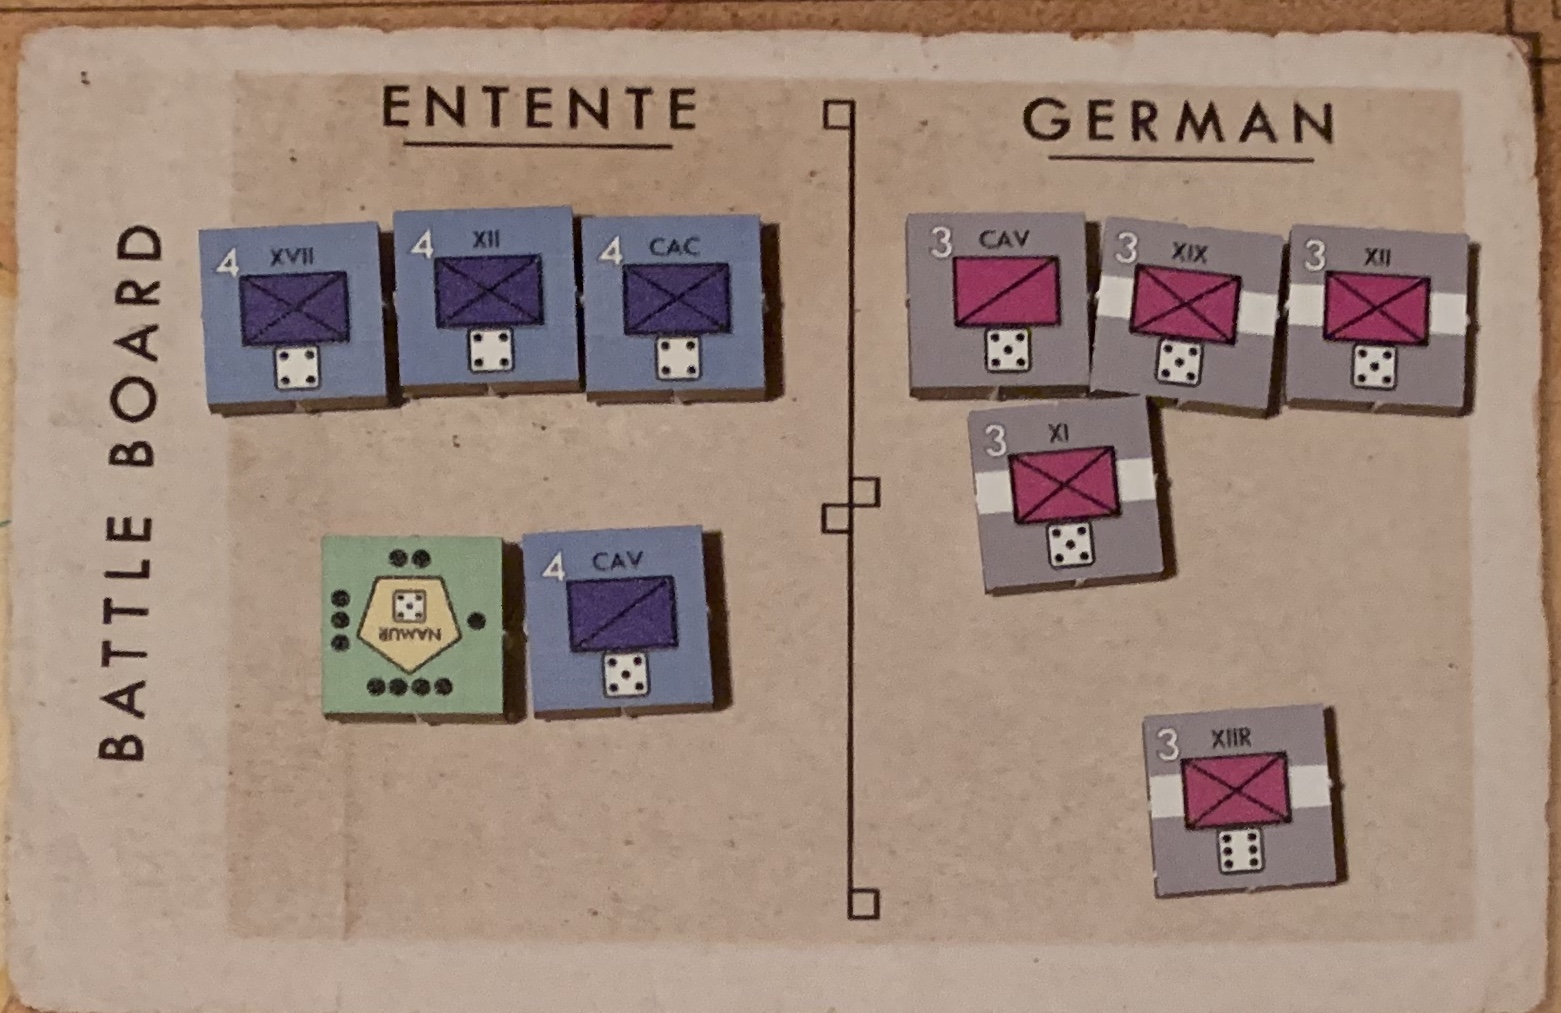
The fifth chit activated the Fourth German Army, which took its six strongest units (VI, VIII, and XVII Corps, all strength 4, as well as VIII Reserve, XVII Reserve, and the Cavalry Corps, all strength five) and marched into Namur to attack the Fort, along with their siege artillery (Big Bertha event). The German strength 4 units inflicted 1 hit (rolling 5, 3, 1), and the German strength 5 units inflicted 3 hits (rolling 6, 6, 5). This is a disastrous result for the French and Belgians, as it will eliminate the fort and the two French units there. The Fort and the French units roll 4 dice at strength 5, but inflict no hits rolling (4, 3, 2, 1). The Fort is destroyed with no German losses. The French Fifth Army, sitting in Charleroi, watches in horror as the Germans seize the fort and prepare to turn towards France.

Chit six was the German forced march, followed by the second Turn End and the Zepplins event. The ninth chit activated the German Third Army, which moved form Namur to Tienen. The tenth chit activated the German First Army, which used the forced march event to move to Louvain.

The eleventh chit activates the German First Army, which launches a counterattack against the British in Ghent, using Zepplins to boos their firepower. The Germans attacked with 3 units at 4 (rolling 6, 5, 5; 3 hits), 2 units at 5 (rolling 6, 3; 1 hit), and 3 units at 6 (rolling 4, 3, 3; 0 hits). The BEF defends with 1 unit at 4 (rolling a 2), and 2 units at 5 (rolling 6, 1; 1 hit). The British are eliminated, but they manage to reduce the German III Corps (4 -> 5). The Germans have now moved back across the victory line, and appear unstoppable.

The twelfth chit activates the Belgian army, which places itself between the German First and Second armies in Mechelen, hoping that it can work with the French Fifth Army to force the German First Army to take a damaging multi-space retreat.

There are four chits left in the cup: French Fourth Army (eliminated), French Fifth Army, Sabotage, and Turn End. If the Entente can pull French Fifth Army before the turn end chit comes up, they have a chance. Unfortunately, the chits came up French Fourth Army, Sabotage, Turn End, leaving the French Fifth Army inactive in Charleroi.

The Fifth Army is somewhat tardy.

Turn Six, August 19-21

Turn six is the first opportunity for the Germans to win. If they manage to hold a space past the victory line, they will win the game.

The first chit activates the much-reduced German Third Army, which attacks the Belgian army at Mechelen. The Germans have 2 units attacking at 5 (rolling a 6, 1; 1 hit), and the Belgians have 1 unit defending at 5 (rolling a 5; 1 hit). The German XIX Corps is eliminated, and the Cavalry are forced to retreat to Louvain. The Belgian Fifth Division is reduced (5 -> 6).

The second chit activates the German First Army. Because there are only two possible activations for the Entente (the French Fifth and the Belgian Army), the First Army can position a blocking force in Ath and essentially guarantee a victory. The Germans move two units of 5 strength infantry to Ath, and keep the rest of their forces in Ghent. The only sequence likely to produce an Entente victory is if the Entente draws forced march before the French Fifth Army activates, wins in Ghent with the Fifth Army, and then is able to force a retreat from Ath with the remnants of the Belgian Army.

Ultimately, that eventuality doesn’t come to pass. The French Fifth Army activates next, and moves to crush the Germans at Ath, doing 5 hits to the Germans 2. The German Fourth Army activates and slouches towards the victory line, but can’t quite get there (one movement point short). The next chit activates the Belgians, who launched a doomed attack on Ghent. They do not get any hits, and are eliminated by concentrated German fire.

Because neither the French nor the Belgians were able to dislodge the Germans from the Victory Line, the Germans win. The Belgians fought bravely, losing every non-Garde Civique unit in their army (1, 2, 3, 4, 5, and 6 divisions, 14th and 18th Brigades, and the Belgian cavalry) in their efforts to stop the Germans. The British fought bravely as well, with the BEF eliminated after striking a substantial blow against the Germans at Ghent. Only the French acquitted themselves poorly, with the Fifth Army frequently being too slow to act. Had the French marched on Namur from Charleroi, the war may have been different.

Concluding Thoughts

I enjoyed my playthrough of Brave Little Belgium. The chit pull engine that drives the game creates great moments of drama, even when playing solitaire. Although the basic action of the game is scripted–the Germans are going to invade Belgium every time, after all–the variety introduced by the sequence of chits means that you are likely to face a different tactical puzzle each time you play. Having only played once, I can’t speak to how many plays it would take for you to exhaust the interesting decisions in the game, but I imagine it is good for several plays.

If you have opponents, as opposed to just playin solitaire, Brave Little Belgium could shine as an introduction to wargames for a new player. The relative lack of complexity in the rules makes it easy to learn and teach, and the point-to-point movement system and simple movement point allocation makes it easy to see your available options at any given time.

I imagine that I will play this again soon, as I want to see if I can maneuver the Entente to hold out past August 27, or to force the Germans to take a fifth atrocity token.

Brave Little Belgium: First Play (Part Three)

Turn Three, August 10-12

It turns out that the German Fourth Army was more than ready to begin its role in the invasion. The first chit activates the German Fourth Army, which moves from Trier to Arlon. The second chit is a Turn End chit (1/3).

The third chit activates the German Third Army, which moves back to Namur and attacks. The Germans have 4 units at 5 (rolling 6, 6, 4, 1; 2 hits) and 1 unit at 6 (rolling a 2). The fort has 4 dice at 5 (rolling 4, 4, 4, 2; 0 hits). The fort loses two steps, and the Third Army lays siege.

The fourth chit was the Zepplin event, and the fifth chit activated the German Second Army. The Army attacked Liege, with the support of Zepplins. The Germans have 3 units at 4 (rolling 3, 3, 1; 2 hits with the Zepplin bonus), 1 unit at 5 (rolling a 1; 0 hits), and 4 units at 6 (rolling 5, 4, 2, 1; 1 hit with the Zepplin bonus). The Belgian defenders have the fort, with 2 strength at 5 and 1 unit at 5 (rolling 5, 5, 1; 2 hits) and 3 units at 6 (rolling 6, 6, 5; 2 hits). The Germans are forced to retreat, and take four step losses, reducing the Guards Corp, VII Corp, and X Corp (4 -> 5) and eliminating the Landwehr Brigades. The Belgians take three step losses, reducing the First Division, and eliminating the Fourth Division and 14 BG.

The sixth chit activated the French Fourth Army, which moved from Mezieres to Givet. The seventh chit is another Turn End (2/3). The eighth and ninth chits are German events (Big Bertha and Forced March), and the tenth and final chit is the last Turn End chit (3/3).

The Germans risk atrocity, activating the First German Army. The Germans roll a 5, moving the atrocity marker to 4. One more atrocity and the Germans will lose the game. First Army Attacks Tienen, crushing the single unit there. Unfortunately for the Germans, the Garde Civique puts up a heroic defense, forcing IV Reserve Corps to take a step loss (5 -> 6), and preventing the Germans from advancing.

Turn Four, August 13-15

The first chit activates the German Second Army, which again attacks Liege. The Germans have 4 units at 5 (rolling 6, 6, 5, 2; 3 hits) and 3 at 6 (rolling 6, 3, 2; 1 hit). The Belgians have two fort steps at 5 (rolling 5, 1; 1 hit) and two units at 6 (rolling 1, 1; zero hits). Four hits by the Germans eliminates the two Belgian units (First and Second Infantry Divisions) and the Fort at Liege. The Germans eliminate the VII Reserve Corps. The Germans have accomplished their first objective. The Entente can succeed only by defending Namur or securing the victory line.

The second chit is a Turn End (1/3), and the third activates the French Fourth Army. The French move to Namur to attack the Germans there.

The French defense of Namur.

They have 3 units at 4 (rolling 6, 4, 2; 2 hits) and 3 at 5 (rolling 3, 3, 2; 0 hits). The Germans defend with 4 units at 5 (rolling 6, 6, 4, 4; 2 hits) and 1 unit at 6 (rolling a 2; 0 hits). The French reduce XII and XVII Corps (4 -> 5), and the Germans elimiante XI and XII Reserve Corps.

The fourth chit is the German forced march event, and the fifth chit is the German First Army. The German First Army uses forced march to push on to Ghent, across the victory line.

The sixth chit activates the Belgians, who fire from the Namur fort, causing no damage. The seventh chit is the Zepplins event.

Chit eight activates the German Third Army, which moves back to Namur to attack, utilizing Zepplins. The Germans attack with 3 units at 5 (rolling 6, 4, 4; 3 hits with the Zepplin bonus). The French fire back with 1 unit at 4 (rolling a 3; zero hits) and 5 units at 5 (rolling 6, 3, 3, 3, 2; 1 hit). The Germans eliminate XII Corps, while the French eliminate XII and XVII Corps and reduce CAC (4 -> 5). The Germans are now besieging Namur.

The ninth chit activates the German Fourth Army, which moves to Marche, indending to support the attack on Namur.

The tenth chit activates the British (finally), who move to Ath, preparing to try and push back the German First Army. The French Fifth Army activates next, moving to Charleroi, preparing to reinforce Namur.

Big Bertha and Sabotage are drawn next, followed by the next two Turn End chits.

The Germans are looking pretty strong at this point, with an army past the victory line and Liege eliminated. The French Fifth army may have their work cut out for them defending the Namur fortress.

Brave Little Belgium: First Play (Part Two)

Turn One, August 4-6

On the first turn, the German’s get a special cavalry phase, where each cavalry unit may activate. First Cavalry moved to engage the Belgian Cavalry unit in Massely. Combat in Brave Little Belgium is handled by rolling a single die for each unit. If the result is equal or greater to the die symbol on the unit, then they scored a hit. Each hit results in a step loss for the opponent. Because there are no replacements or reinforcements in this game, every step loss has permanent consequences. The Germans were luckier than the Belgians this time, and they inflicted a loss on the Belgians, eliminating the Belgian Cavalry, without taking any losses themselves.

Second Cavalry moved to Verviers, engaging the Garde Civique there. The Garde Civique unit turned out to be a six, the weakest type of Garde Civique. Second Cavalry engaged, but the skirmish was ineffective, and they cavalry was forced to retreat to the Second Army’s main force. Third Cavalry engaged the Garde Civique in Bastogne (a 5), and eliminated it. Fourth Cavalry moved to Neufchateau, taking up a blocking position.

The first chit drawn was Big Bertha, giving the Germans an event. Big Bertha may be used during a battle involving a fort to inflict one automatic hit on the fort.

The second chit activated the Belgian Army, who were able to take the first march. The Fourth Division in Namur and the Sixth Division in Tienen move to Liege, bringing the total stack there up to four divisions and one four strength fort, the stacking limit. The First and Second Divisions moved from Louvain to Wareme, in position to reinforce Liege or retreat to Namur, depending on the outcome of the turn.

The third and fourth Chit were Zepplins (+1 DRM for the Germans in a single combat) and Sabotage (Entente may use to reduce German movement points by 1). The fifth and sixth Chits were Turn End chits. If one more of those is drawn the turn will end, potentially before the Germans can take any action.

The next Chit was activation for the First Army. The Entente used the sabotage event, which prevented the main force of the First Army from moving at all. Specifically, it reduced infantry movement to 1 movement point, and the First Army can only advance along difficult terrain, which costs 2 movement points. The First Cavalry moved to engage the Garde Civique in Tienen (a 6), but the combat was inconclusive, and no losses were suffered.

The eighth chit was the Entente Forced March event, which allows an Entente army to add one to their movement points when activated. This was no use to the Entente this turn, as the Belgians had already moved, and the French and British were not ready yet. The ninth Chit was the final Turn End chit, which left the German Second and Third army sans activation.

The Germans elected to push the armies ahead, knowing that there may be some atrocities as a result. First, the Germans activated the Second Army, rolling a 6 on the atrocity die roll, and advancing the atrocity marker to 2. Second Army advanced into Verviers, engaging the Garde Civique there. The Second Army hit, and the Garde Civique missed. Because Second Army took no losses, and was at least five times bigger than its opponent, it was able to advance into Liege.

The Siege of Liege

The first Battle of Liege saw the Germans deploy Zepplins and Big Bertha to assault the fortress. Germany had 3 units attacking at 4 (rolling 5, 1, 1; 1 hit), 4 units attacking at 5 (rolling 6, 4, 3, 1; 2 hits, thanks to the +1 drm from Zepplins) and 1 unit attacking at 6 (rolling 1). The Germans inflicted 3 hits, plus one automatic hit on the Fortress. The defenders had 3 units and 4 steps of the fort defending at 5 (rolling 6, 4, 2, 1, 1, 1, 1; 1 hit) and one unit defending at 6 (rolling a 3). The Defenders took step losses to the Third, Fourth, and Sixth divisions (all reducing from 5 to 6) and took one hit on the fort from Bertha. Germans took a single step loss on the X Corps Reserves (XR, reducing from a 5 to a 6). The Germans won the battle, and settled in for a siege of Liege.

The Germans also activated the Third Army, who likewise committed an atrocity (rolling a 4 and advancing the atrocity marker to 2). The Third Army moved to La Roche-en-Ardennes, and the Third Cavalry moved from Bastogne to Marche.

Turn Two, August 7-9

Turn two began with the Entente drawing their forced march counter. Next, the German First Army activated, moving the main force to Tongeren, while the Cavalry advanced to challenge the Garde Civique in Tienen, but the battle ended without casualties.

The next three chits were the Big Bertha event and two turn end chits. Once again, the turn may end before the majority of the armies on the map get to activate.

The sixth chit activated the Belgian Army. The reduced Third and Fourth Infantry divisions in Liege retreated to Namur, and the First and Second Infantry divisions moved into Liege to support the Fort. The Fort took a shot at the Germans, who did not spend the Big Bertha chit at this time, and thus cannot shoot back. It rolled three dice at 5 to hit, and landed one hit on the Germans, reducing the Guards Reserve Corp (GDR) from 6 to 5.

The next chit was the German Forced March chit, followed by the Second Army. The Second Army launched a second attack on Liege, using Big Bertha for an automatic hit on the fort. The German attackers had 3 units at 4 (rolling 5, 2, 2; 1 hit), 2 units at 5 (rolling 3, 2), and 3 units at 6 (3, 3, 2). The Belgians fired with 3 fort steps and 2 units at 5 (5, 4, 4, 4, 2; 1 hit) and 2 units at 6 (4, 2). The Belgians inflicted one step loss, reducing the VII Reserve Corp from 5 to 6. The Germans inflicted one step loss plus one automatic for loss, reducing the Second Infantry Division from 5 to 6, and the Fort to 2 strength.

The ninth chit was turn end, leaving the French Fifth Army and German Third Army chits in the cup. Germany elected to activate the Third Army, rolling a 5, and therefore committing a third atrocity. The Third Army used the forced march event to move from La Roche-en-Ardennes to Marche to Namur, laying siege to the fortress.

The Siege of Namur

The Germans had 3 units at 4 (rolling 6, 1, 1; 1 hit), 2 units at 5 (6, 3; 1 hit), and 1 unit at 6 (6; 1 hit). The Belgian defenders had the fort, rolling 4 dice at 5 (rolling 6, 5, 5, 2; 3 hits) and 3 units at 6 (rolling 6, 6, 2; 2 hits). The staunch Belgian defenses dealt five hits to the Germans, resulting in a retreat and step losses to the XI, XIII, and XIX Corps (all 4 -> 5), the XIII Reserve Corp (5 -> 6) and eliminated the 47th Mixed Landwehr Brigade (LB). The Belgians suffered three losses, eliminating the Third and Fourth Infantry divisions and the 18 BG.

The Belgians struck a major blow against the Germans at Namur, but their forces are starting to wear thin. They will need the French to activate and save them. The Germans, meanwhile, will need the Fourth Army to come and support the Third Army in the siege of Namur. The siege of Liege, on the otherhand, is going well for the Germans, and they will likely be able to use the First Army to push towards the victory line.

Forgot to retreat the German Third Army in this picture.

SpaceCorp: First Play (Part Eight)

Turns 72-76

3S&M attempted a mission to Epsilon Indi, but when it arrived it found SpaceCorp bases and a SpaceCorp colony, leaving it without resources to plunder. SpaceCorp, in the mean time, built a new colony on Tau Ceti (Construct Kim colony, at the end of the era, claim one unfulfilled contract, +1 Profit from Smith colony.

CNSA-DS sent a team to Gloombridge 1618, piggybacking on SpaceCorp’s efforts there. SpaceCorp explored Gloombridge 1618, discovering an introverted Alien Culture (Introvs, +2 Profit, Genetics 1, Revelation 1, P2, Col. 1, must have Sensory Focus adaption to build base). The Introvs’ home world was surrounded by an icy asteroid belt that could provide readily available water for colonization efforts. (P1, Col. 1).

3S&M, after several years of arduous efforts, finally managed to reverse engineer SpaceCorp’s Environmental Tolerance adaption, obtaining it for their own teams. They were aided by a leak of critical SpaceCorp data, as well as the inherent pressures of competition. (Discards all offers, draws Leak and Competition edge cards, each of which result in -2 Profit for SpaceCorp). SpaceCorp, in the meantime, successfully completes new genetic modification research, enabling enhanced sensory focus on its operatives. (Discard Evolution Accelerators for Genetics 2).

CNSA-DS acquired all of the available market offerings, including some lucrative genetic research (+1 Profit). SpaceCorp Acquisitions focused on obtaining construction equipment and engineers in order to build bases around Groomsbridge 1618. (Research, acquire Nano Splicers (Build 5, Genetics 1), Survey Miner (Explore 3, Production 1), draw Advanced Antimatter Drive (Move x4, Build 5)).

Seeing SpaceCorps efforts, CNSA-DS manages to steal a march, building its own bases and colony at Groomsbridge 1618. CNSA-DS builds two secure bases (-1 Profit for SpaceCorp for each) and Papadopolous Colony. (+5 Profit). SpaceCorp, frustrated in its colonial ambition, shifts to a production heavy strategy, looking to leverage its advantage in resource extraction. (Produce 2, +6 Profit).

Those monsters took Gloombridge 1618!

Turns 77-81

CNSA-DS sends an exploratory team to Kapteyn’s Star, finding Abundant Life among the systems Planetessimals. (+1 Profit). SpaceCorp pushes its research and development group to expand production capacity, developing or acquiring Nanominers (Build 5 Produce 2) and two sets of Analytic Excavators (Produce 2, Revelation 1).

CNSA-DS next spends a year celebrating the successful establishment of Papadopoulos colony in Groomsbridge 1618. (Draw Groomsbridge 1618, take no further action). SpaceCorp starts its production push, mining rare elements and transporting water across its holdings. (+6 Profit).

3S&M finishes the infrastructural investment contract that it began many years ago, reaping a small amount of profit. (+2 Profit.) SpaceCorp continues its production push, exploiting its available resources. (+6 Profit).

3S&M again catches up with SpaceCorp, developing an Entangled Transmitter to enable more efficient colonization of distant stars. SpaceCorp discovers that its Survey Miners are no longer compatible with its infrastructure, and has to discard them. (Discard Survey Miners (Move 4, Explore 2) and left with default Move 1). SpaceCorp continues to mine. (+6 Profit).

CNSA-DS is not done with its colonial efforts, as it establishes bases and a colony around Kapteyn’s Star. They construct a bio lab (+2 Profit) and Spaceport. The Spaceport enables CNSA-DS to launch a team into an Orion Spur, further than any other mission (+5 Profit). CNSA-DS also founds Ahmed Colony (+4 Profit). SpaceCorp, oblivious to the new colonization frenzy, continues to extract minerals and sell them. (+6 Profit).

Turns 82-88

CNSA-DS continues its exploratory efforts, discovering a habitable planet and rich asteroid belt in 61 Cygni. (+3 Profit). SpaceCorp, surprising no one, continues to leverage its production advantage. (+6 Profit).

3S&M continues its reverse engineering efforts, discovering the secret to SpaceCorp’s Star Children. 3S&M invests in genetics technology from the market as well, gaining profit. (Take all offers, +1 profit). SpaceCorp once again extracts and sells resources from its refineries. (+6 Profit).

3S&M’s exploration division turned up new findings at Lacaille 9352, discovering an Asteroid Belt made up of exotic elements. (+2 Profit). 3S&M built a base and colony in the region, obtaining additional profits. (Cohen colony, +4 Profit). The instruction of bases in Lacaille 9532 also fulfilled a contract, resulting in substantial profit for 3S&M. (Fulfill Contract 2 (colonies with at least 16 value), +9 Profit). SpaceCorp, jealous of these profits, doubled down on extracting resources. (+6 Profits).

3S&M continued the boom in colony creation, exploring Ross 780 and constructing bases and a colony there. 3S&M discovered a rich habitable world (+2 Profit) on which it built a refinery. (+2 Profit. 3S&M constructed Colony Zhang, which proved extremely profitable. (+6 Profit). SpaceCorp continued to mine away. (+6 Profit).

CNSA-DS and 3S&M paused to digest their new colonial holdings, while SpaceCorp began a new spate of research, looking for additional methods of extracting minerals or constructing bases. With the resulting gains, SpaceCorp built its first base around Alpha Centauri, an exploiter, which strip mined the planetary system there for resources. (+2 Profit). [At this point, I noticed that I missed the bases in 4 non-adjacent regions contract for the Competition, another +9 profit for them.]

3S&M built the final bases and colony of the era in the 61 Cygni system. (+1 Profit base, +6 profit Khan colony). SpaceCorp continued researching, attempting to find one last area to eke out profit. (Research, drawing remainder of deck). To close the era, SpaceCorp invented the first practically produced faster-than-light drive, ensuring profits going forward. (+2 Profit.)

End Game Scoring

Before any modifications, the final score was 113 to 119, in favor of the Competition. SpaceCorp receives a +8 bonus for having 3 colonies, and a +7 bonus for claiming contract 4 via the Kim colony. Final score is 128 to 119 in favor of SpaceCorp. At the end of the era, SpaceCorp has a narrow lead over its main rivals, CNSA-DS and 3S&M.

The map at end of game.
The final score.

SpaceCorp: First Play (Part Seven)

Turns 62-66

CNSA-DS sends a team to Kapteyn’s Star, which is the final system before a long trek to an Orion Spur. SpaceCorp continues its efforts in Epsilon Indi, building the first interstellar colony. (Build Butterfield Colony. 1 CP Environmental Tolerance, 1CP Industrial, 1 CP from Habitable Planet). This fulfills a contract (+3 Profit). SpaceCorp scientists, working feverishly in the Lunar laboratories at corporate headquarters, create a Faster Than Light Prototype, potentially enabling travel outside of the nearby stars. (Move x5, Explore 6).

CNSA-DS acquires all available offers, continuing its efforts to acquire all relevant space technology. SpaceCorp utilizes its intercepted communications to move faster than the competition. First, SpaceCorp sends a team form Epsilon Indi to Gliese 1, a nearby star system. As SpaceCorp’s team slowly reestablishes communication, SpaceCorp performs research and development, obtaining an additional FTL Prototype, Evolution Accelerators (Revelation 1, Genetics 2), and an Antimatter Surveyor (Move x4, Explore 4).

The team from 3S&M orbiting Lacaille 8760 finally reported back its explorations. It identified Abundant Life and discovered an Alien Outpost (+2 Profit). SpaceCorp continued its research spree, as the Gliese 1 team continued to work to reestablish communications. SpaceCorp obtained Nanominers (Build 5, Produce 2), a Clone Forge (Produce 1, Genetics 1), and Quantum Leap (Research 2, Revelation 1).

CNSA-DS finally explores Luhman 16, discovering a planetary system. CNSA-DS constructs a shield factory in the system and sets up its first colony. (Jensen, +3 Profit). SpaceCorp’s team finally reestablishes communications from Gliese 1, and reports on its discovery efforts. The team makes contact with a race of Aliens that SpaceCorp has codenamed the Minds. The Minds appear to be friendly, and share their knowledge and resources. (+2 Profit, Genetics 1, Revelation 2).

CNSA-DS continues its exploration spree, this time exploring the Epsilon Erdani system. The system contains a planetary system, and asteroid belt, and alien ruins. (+2 Profit). SpaceCorp constructs an industrial base around Gliese 1, preparing the way for a human colony.

Turns 67-71

3S&M send out yet another team, this time to Ross 780, nearby to Gliese 1. SpaceCorp constructs its second interstellar colony on Gliese 1, named Smith. (1CP Environmental Tolerance, 1CP Industrial, 1CP Nearby Colony, 1CP from using 8 build, Smith gives +1 profit each time I place a colony, including this one. +1 Profit).

3S&M also sent a team to Gliese 1, before it was discovered that SpaceCorp had set up bases there. Once the team encountered the outlying bases, it turned back. SpaceCorp, meanwhile, had a technological breakthrough (discarding Quantum Leap), developing Entangled Transmitters. (+2 Profit, place team from Sol on Tau Ceti).

3S&M followed SpaceCorp to Tau Ceti, placing their own team in orbit. SpaceCorp had the first-mover advantage, however, and was able to explore the star system and stake a claim. SpaceCorp discovered a Primitive Alien Culture (+2 Profit, Genetics 1, Col. 1, Base +4), encountered a critical delay (-2 Profit), and discovered an Ocean planet around Tau Ceta (Genetics 1, Col. 1, Base +4). The Genetic Information recovered from Tau Ceti enables SpaceCorp to develop living Hybrid bases. (+1 Profit, may place two bases on Primary tiles.

CNSA-DS explored Wolf 1061, discovering an Anomaly and Rings, but no planets. (+2 Profits). SpaceCorp conducted research, obtaining the technology for Mega Structures (Build 5), DNA Synthesis (Produce 2 Genetics 2), and an Antimatter Lifter (Move x4, Build 4).

CNSA-DS deployed bases in Epsilon Eridani, moving towards constructing a colony. CNSA-DS placed a Shield Factory, Exploiter, and Secure Base. (-1 Profit to SpaceCorp due CNSA-DS having more Secure bases.) SpaceCorp began construction of bases around Tau Ceti including a Biolab, Spaceport*, and Industrial base, paving the way to colonize Tau Ceti. (*Forgot to place extra base for Hybrid adaption, added later).

SpaceCorp: First Play (Part Six)

Turns 52-56

The newly merged China National Space Agency and Dynamic Synergistics (CNSA-DS) used its combined resources to aggressively explore nearby star systems. Frustrated at their failure to get to Alpha Centauri first, CNSA-DS sent a team to explore Groombridge 34. While that team was in transit, SpaceCorp began to explore Alpha Centauri, and discovered a rich planetary system with exotic life. (+1 Profit. +1 Genetics. P1, Col. 1, Base +4). SpaceCorp also developed a First Generation Anti-Matter Drive, which would substantially increase SpaceCorp’s movement capacity. (Move x3, Explore 3).

CNSA-DS continues to expand, sending a team to 61 Cygni, a system nearby Groombridge 34. SpaceCorp elected to focus on research, looking for the ability to move beyond Sol and Alpha Centauri, focusing on the Epsilon Indi system. SpaceCorp developed Fusion Lifters (Move 5, Build (S) 3) and Fusion Boosters (Move 5, Move (S) 3.)

SpaceCorp rival Strategic Space Survey and Mining (3S&M) would not be left out of the interstellar exploration game. 3S&M sent a team to explore Lacaille 9352. SpaceCorp, having acquired the necessary drive technology, launches a team to the Epsilon Indi star system. (Relying on Infrastructure (8 shielded) Discarding Fusion Booster (+5), 2x Fusion Lifter (+10, total 23), and a First Generation Antimatter Drive (x3, total 69), which allows a move out of Sol, costing 30, and into Epsilon Indi, also costing 30.) SpaceCorp R&D developed an additional Fusion Booster.

CNSA-DS sent yet another team out to a distant star system, this time exploring Wolf 1061. SpaceCorp, looking to explore Epsilon Indi, focused on research and acquisition. SpaceCorp’s HR department returned to its briefcase full of money roots, recruiting two teams of experienced Interstellar Engineers (Build 3 Explore 3). SpaceCorp R&D produced a second version of the First Generation Antimatter Drive.

3S&M, in addition to its interstellar exploration, also decided to focus on infrastructure contracts, looking to obtain lucrative benefits from the space exploration market. (Contract 6). SpaceCorp, having acquired its stellar engineering teams, decided to explore Epsilon Indi. (4 Infra, Discard Interstellar Engineers (+3), First Generation Antimatter Drive (+3), total 10). SpaceCorp found a wealth of riches in the system. The first and primary discovery was a fine dust composed of extremely precious rare elements. (P2, Base +4). In addition, SpaceCorp found a world with exotic life (+2 Profit, Genetics 1) and a habitable world (Water, +2 Profit, Col. 1, Base +4). SpaceCorp would need to build up substantial resources in order to contruct bases, but the results could be lucrative (Build 28 required). SpaceCorp R&D debuted a new technology: Nanominers. These nanomachines would enable extremely efficient construction or resource extraction. (Build 5, Produce 2).

Turns 57-61

3S&M continues its expansion into the Lacaille systems, sending a team to Lacaille 8760. 3S&M also decided to contest SpaceCorp’s mission to Alpha Centauri, moving a team there as well. SpaceCorp begins a massive research and development push, hoping to develop the necessary technology to build bases, and eventually a colony in, Epsilon Indi. The first research efforts resulted in recruitment of another group of Interstellar Engineers, and the development of the technology to build Megastructures (Build 5, upgrade). Continued research resulted in the creation of additional Extruders (Build 3, Build (S) 2), and the recruitment of a crack team of exo-investigators (Explore 3, Revelation 1).

CNSA-DS went on another buying spree, clearing the market of all goods, without any immediate profits. SpaceCorp finally made some progress on revelations, discovering practical applications of Quantum Mechanics that improved research (Research Actions +1).

CNSA-DS continued its exploratory efforts, sending a team to Epsilon Eridani. SpaceCorp, utilizing applied quantum mechanics, continued its research efforts, developing additional nanominers, extruders, and exo-investigators.

CNSA-DS accomplished another technical breakthrough, discovering Infrastructure Transfer. This innovative approach to infrastructure, while not obviously exciting, was extremely profitable (+2 Profit). SpaceCorp had finally accumulated the necessary resources to build bases in Espilon Indi. Using 1x Megastructure, 2x Extruders, 2x Nanominers, and 1x Interstellar Engineers, along with its base infrastructure, SpaceCorp built three bases in the system. SpaceCorp built a Refinery to best exploit the Precious Dust surrounding the star, and an Industrial base on the habitable planet, preparing the way for a colony. SpaceCorp constructed a biolab, studying the exotic lifeforms in Epsilon Indi, discovering new methods of Environmental Tolerance. (+1 Profit, +1 colony point). SpaceCorp also managed to intercept transmissions from its competitors, gaining valuable intelligence. (Draw Intercept, Move x4 or Edge: Take two turns).

SpaceCorp: First Play (Part Five)

Turns 41-45

Dynamic Synergistics work on genetic modification and enhancements paid dividends, as they discovered a gene therapy process that would allow human explorers to become radiation resistant. (Adaptation Radiation Resistance, Offers 3, 4, +2 Profit total.) SpaceCorp constructed a refinery on Io, its third base on Jupiter’s moons. (+5 profit for fulfilling contract 5, three bases in one region).

Dynamic Synergistics acquired additional technology from the market, including a rare Antimatter Prototype drive. SpaceCorp shifted its team from Titania to Ariel, preparing to explore the moon. 3S&M acts deploys a team to Iapetus, hoping to exploit the exo-microbes and exotic elements littering its surface. SpaceCorp’s exploration team on Ariel found Abundant Water, which it was able to exploit for an immediate profit. (+2 Profit, Base -2). SpaceCorp constructed a Research base on Ariel (mistakenly advancing its revelation cube, which is not legal in the Planeteers phase) while Dynamic Synergistics continued its buying spree.

CNSA explorers continued their efforts on Saturn’s moons, discovering exo-microbes on Enceladus, which they were able to exploit for immediate profit. SpaceCorp focused on positioning its teams, sending its team on Ariel to Umbriel, hoping to complete the exploitation of the Uranian moons. The team on Io was likewise relocated to the Spaceport on Titania.

Turns 46-51

As genetic modification efforts continue, explorers from Dynamic Synergistics are verging further from standard humans in appearance. The newest breakthrough sufficiently reduced the body mass of their explorers, the first change that was obvious to the naked eye. (Adaptation Low Body Mass, +1 Profit.) Dynamic Synergistics also continued to exploit the market, using substantial influence to increase profits. (Offers 1, 4, draw Market Influence as a replacement card, +2 Profit.) Spacecorp continued its exploratory efforts, discovering exotic elements on Umbriel. (+2 Profits, P2, Base +2.)

Dynamic Synergistics continues to chase genetic engineering technology, even at the cost of profits. (Offers 2, 3, 4, including one genetics card for -1 Profit, followed by Offers 1, 3, 4, including two genetics cards for -2 Profit.) SpaceCorp, ignoring genetic research in favor of boots on the ground, moved a team from Titania’s spaceport to neighboring Oberon, on which abundant water had already been found. The team built an industrial base on Oberon, in order to ease the development of the other moons in the region.

Dynamic Synergistics genetic modification team had yet another breakthrough, creating a gene therapy that allowed for exquisite Sensory Focus. (+1 Profit). Dynamic Synergistics continued its buying spree, clearing the market for a new run of fusion drives. (Offers 2, 3. +1 Profit. Remove Analytic Excavator and Mobile Labs. Add 2x Fusion Drive.) SpaceCorp teams on Umbriel, aided by the industrial base on Oberon, were able to construct a research facility, developing Fusion Drives to push toward the Oort Cloud. (Build research base, Take Fusion Drive from offers). The completion of four bases on planets with water fulfilled a contract, earning further profit for SpaceCorp. (Fulfill contract 7, +5 Profit).

3S&M’s research teams had been active for years working on practical applications of Quantum Mechanics. They had a breakthrough, creating quantum computing systems that were revolutionary, generating substantial profit. (Breakthrough: Quantum Mechanics, +2 Profit. Also, I forgot to award Contract 1, two progress cards earlier, resulting in an additional +3 Profit.) SpaceCorp, continuing its focus on exploration, launched a mission from Umbriel to the Oort Cloud, relying on newly acquired Fusion Drives for the final push. (Take First Beyond marker.)

Dynamic Synergistics managed to acquire key technologies that undermined SpaceCorps ability to freely operate. While SpaceCorp was eventually able to acquire the license, it took a toll on profitability. (Offers 1, 2, 3, +1 Profit. Draw Competitors, which has the edge effect of -2 Profit for SpaceCorp.) SpaceCorp focused on upgrading its travel capacity, replacing its Closed Gas Core Nuclear Drive with Survey Drone technology. (Move 4, Explore 2).

The board at the end of the era.

The End of an Era

The expansion of SpaceCorp to the Oort Cloud opened up a new era of space exploration. No longer content to remain in the solar system, humanity had entered an era of Starfarers.

SpaceCorp maintained its highly profitable Water and Abundant Ores refinery on Io as a key profit center going forward. Thanks to its pole position exploring the stars, it had a team in place orbiting Alpha Centauri before any competitor could make their move.

The massive growth of Dynamic Synergistics, paired with the cost of interstellar travel, led to an unexpected merger. The CNSA, long subject to the whims of China’s authoritarian capitalists, agreed to a joint venture to colonize the stars, which would be called CNSA-DS Interstellar, which would explore the near-earth star Luhman-16.

SpaceCorp: First Play (Part Four)

Turns 31-35

Dynamic Synergistics, in a burst of activity, acquired a number of promising technologies from the market. First, they acquired Deep Space Probes and Micromesh. Their advanced probe technology intercepted SpaceCorp transmissions, allowing Dynamic Synergistics to gain some interesting technical data. (One of the replacement cards is Intercept, which lets the competition take another turn after this one). Dynamic Synergistics was able to put together the pieces it intercepted from SpaceCorp with its own internal data to develop breakthrough Energy Fields (+2 Profit). After Dynamic Synergistics shopping spree, the market was focused on Genome Accelerators (Research 2, Genetics 1) and Nuclear Mass Drivers (Move 5, Build 3). During this time, SpaceCorp was improving its infrastructure, upgrading its Solid Nuclear Drives to Open Gas Core Nuclear Boosters (Move (Shielded) 4, Build (Shielded) 2, Upgrade).

Dynamic Synergistics, through its subsidiary Synergistic Dynamics, announced a successful launch of a survey team to Europa. SpaceCorp continued its upgrade efforts replacing its Grown Mesh technology with Micro Mesh (Build 3, Explore 2).

The irrepressible 3S&M, determined to continue competing with SpaceCorp for territory, made its own push for the Uranian moons, landing a team at Umbriel. SpaceCorp, using a new Open Gas Core Nuclear Booster, sent its team from Callisto to Titania.

CNSA exploration teams continued there work, even though their survey and construction teams were overtaxed with efforts around Neptune and Pluto. (No free competition teams). CNSA astronauts discovered Abundant Water and Aquatic Life on Titan, but suffered a critical mission delay, wiping out CNSA’s ability to exploit the discovery. SpaceCorp’s team on Titania was shocked to discover a variety of Alien Artifacts on the surface. Research of those artifacts would occupy SpaceCorp technical teams for years. (+2 Profit. Revelation +1).

CNSA exploration teams continued their efforts to map the outer solar system, this time arriving on the Saturnian moon of Iapetus. Iapetus turned out to be home to a variety of exo-microbes that appeared to consume exotic elements on the surface of Iapetus. (+2 Profit). SpaceCorp decided that, in order to effectively explore the Oort Cloud and beyond our solar system, a Spaceport would be required on one of the Uranian moons. Titania was selected as the home of SpaceCorp’s Port Le Guin, which will be the launch point for future interstellar missions.

Turns 36-40

3S&M continues its efforts around Uranus, exploring Oberon and finding liquid water on the surface. (+1 Profit). 3S&M’s teams are otherwise occupied, however, leaving the find open to be claimed. SpaceCorp takes an opportunity to profit, building an exploiter on Ganymede, obtaining ores and water for its bases in the region. (+2 Profit.)

The CNSA turned its focus back to the asteroid belt, exploring the asteroid of Hygeia, and building an industrial base next to the natural wonders they found there. (+2 Profit.) Spacecorp, recognizing that the asteroid belt was about to be fully exploited, sent a team from Ganymede to Vesta, hoping to snipe the site from Dynamic Synergistics.

Dynamic Synergistics began to acquire a variety of technologies that might aid in the construction of a base. They also go down a rabbit hole, exploring seemingly promising genetic technology before determining the results to be a hoax. (Offer 1, 2, 4. One is a Genetics offer, for -1 Profit). SpaceCorp explores Vesta, discovering Water. (P1, Base -1).

Dynamic Synergistics was able to use its newly acquired base building technology to acquire SpaceCorp’s claim on Vesta, constructing a refinery there. SpaceCorp sues, and Dynamic Synergistics settles for a reasonable sum. (+2 Profit to SpaceCorp.) The SpaceCorp team on Vesta packs its bags and heads for Io, in Jupiter orbit, hoping to complete SpaceCorp control of Jupiter’s moons.

Dynamic Synergistics, seeing an opportunity, follows the SpaceCorp team to Io, hoping to jump another claim. The SpaceCorp team on Io explores the moon, staking its claim on the Water and Abundant Ores there. (+1 Profit. P2, Base -1.)

SpaceCorp: First Play (Part Three)

Turns 16-20

With the exploitation of the inner solar system essentially complete, corporations and governments turned their attention to the outer solar system. SpaceCorp, once a plucky start-up and now a major competitor with governments and private companies alike, has managed to land a team of engineers on Ceres, which discovered valuable exotic elements. Relative newcomer Strategic Space Survey and Mining (3S&M), rushed its own team out to Ceres as well. Unfortunately for them, SpaceCorp was able to establish a refinery to extract and process rare elements, claiming all of the valuable real estate on Ceres. (Build action, play Grown Mesh for Build 2 plus infrastructure). SpaceCorp R&D continued to experiment with Grown Mesh as an alternative to traditional construction materials. (Draw Grown Mesh: Build 2, Build (Shielded) 1, Upgrade).

Dynamic Synergistics focused on fulfilling contracts, starting work on an infrastructure project. (Contract 6). SpaceCorp also focused on infrastructure, upgrading its survey module to a Grown Mesh production facility. (Replace Survey Module with Grown Mesh). SpaceCorp Human Resources continued its efforts to attract the finest engineers, recruiting heavily at major engineering programs and offering briefcases full of money to quality candidates. This paid off with a crack engineering team. (Draw Engineers: Explore 2, Build 3).

The CNSA, not to be outdone by corporate rivals, sent its own mission to Hygeia, one of the major asteroids of the belt. SpaceCorp, meanwhile, relocated its survey and engineering team on Ceres to Interamnia, another major asteroid. SpaceCorp R&D developed a Closed Gas Core Nuclear Booster, which allowed significant additional thrust over current boosters. (Draw Closed Gas Core Nuclear Booster: Move 4, upgrade).

3S&M, still smarting from losing out on Ceres to SpaceCorp, located its own team on Interamnia, starting a race to control its resources. SpaceCorp was able to state a claim first, however, as its team explored the asteroid and discovered Abundant Ores (P2). SpaceCorp R&D continued work on nuclear boosters. (Draw additional Closed Gas Core Nuclear Booster).

Dynamic Synergistics, through its Synergistic Dynamics subsidy, decided that it was time to get in on the asteroid rush. They sent a team to the currently unexplored asteroid of Vesta, hoping to find some lucrative resources there. Meanwhile, SpaceCorp’s engineering team on Interamnia, using the expertise of a newly hired engineering team, constructed a spaceport on Interamnia, enabling exploration of the planets and moons beyond the asteroid belt. (Discard Engineers, Build Spaceport on Interamnia, Draw Grown Mesh).

The situation in the asteroid belt.

Turns 21-25

Dynamic Synergistics continued its efforts to dominate the market for space-related goods and services, purchasing Nuclear Boosters and Engineers. New technology entered the market, including Science Boosters (Move 4, Explore 1) and Nuclear Mass Drivers (Move 5 or Build 3). SpaceCorp continues its exploitation of the asteroid belt, sending the team from Interamnia to Pallas. In addition, the team remaining in the inner solar system relocated to the Interamnia Spaceport, preparing to expand to the moons of Jupiter. SpaceCorp “Special Projects Division” reported that they were fully operational and able to provide special services relating to the competition. (Draw Sabotage: Build 4 or Edge: Remove a competition team from a site or contract.)

3S&M, continuing their strategy of shadowing SpaceCorp survey and engineering teams, deploys a team to Pallas. SpaceCorp explores Pallas, finding Abundant Ores (P1, Base -1). SpaceCorp stakes out its claim on the ores, again beating 3S&M to the punch.

Just when SpaceCorp felt that they were pulling ahead, the CNSA announced that it had successfully sent a team to Jupiter’s moon Europa. SpaceCorp continued its asteroid work, constructing a Research base on Pallas, which helped SpaceCorp perfect Closed Gas Core Nuclear Drives (Move 3, Move (Shielded) 2, Upgrade).

CNSA again announced a major victory, with a team placed on Dione, a moon of Saturn. SpaceCorp, realizing the need to push out beyond the asteroid belt, focused on upgrading its aging Chemical Drives to Closed Gas Core Nuclear Drives, which were able to provide radiation shielding for teams pushing beyond the asteroid belt.

In a major coup for the CNSA, their teams successfully employed both Dione and Europa. On Dione, the CNSA found spaceborn microbes, which they were able to exploit for immediate profits (+2 Profit). On Europa, meanwhile, the CNSA made a discovery of epochal signficance. Europa was littered with objects that were clearly the product of a non-human intelligence. While these were not able to be immediately turned to profit, the CNSA send its top men to work on the artifacts. At the same time, Dynamic Synergistics was able to fulfill its infrastructure contract, bringing in additional profits. (Fulfill Contract 6, Profit +2). SpaceCorp, meanwhile, made its first move beyond the asteroid belt, sending a team from the Spaceport on Interamnia to Jupiter’s moon Callisto.

Turn 26-30

3S&M continued its quixotic strategy of following SpaceCorp teams to their exploratory sites, sending a team to Callisto. True to form, SpaceCorp explored Callisto first, staking a claim to the Oceans found just below the surface. (+2 Profit. Base -3). SpaceCorp deployed its Special Projects Division to Europa, and they “convinced” the CNSA to withdraw their claim. SpaceCorp R&D developed an Open Gas Core Nuclear Drive. (Move 6).

3S&M, finally learning its lesson, sent a team to Ganymede, hoping to finally make its own claim on resources. SpaceCorp began construction on an Industrial base on Callisto to help expand its operations in Jupiter orbit. (Discard Grown Mesh in order to provide shielding for the build). Special Projects Division set itself up to grab the best of CNSA supplies coming to the former team on Europa. (Draw Poach, Explore 3 or draw top two cards discarded by Competition after an offers action).

The CNSA reached even further out into the solar system, placing a survey team on Neptune’s moon, Triton. SpaceCorp would need to redouble its efforts to explore to maintain its position as a leader in space exploration. In the meantime, SpaceCorp would focus on building out its operations in Jupiter Orbit. The team from Pallas moved to Ganymede, preparing to compete with 3S&M for the resources there. SpaceCorp R&D invented a revolutionary new Micromesh, which could be used in both building and exploration. (Build 3, Explore 2, Upgrade).

The CNSA’s deep space exploration team proved to be more adept than any expected, pushing beyond Neptune to land a team on Charon, Pluto’s moon. SpaceCorp once again embarrassed 3S&M, exploring Ganymede and finding both Water and Abundant Ores. (+1 Profit. P2, Base -2). SpaceCorp R&D revealed its newest creation, Survey Cyborgs. These modified engineers could more efficiently explore, and were useful as a testbed for genetic research. (Explore 3 Genetics 1).

Dynamic Synergistics announced that its research and development teams had made a major breakthrough in genetic engineering. They had adapted extremophile bacteria to survive the radiation of deep space while still producing energy. This adaption created unparalleled energy efficiency, creating intense demand for Dynamic Synergistics’ products. (Adaption Energy Efficiency, +2 Profit). In addition, Dynamic Synergistics continued its buying spree, acquiring several Science Boosters. This cleared the market for some new technology in which SpaceCorp was intensely interested. It acquired an Open Gas Core Nuclear Booster, which enabled shielded movement and construction. (Move (Shielded) 4, Build (Shielded) 2, Upgrade). SpaceCorp also developed a new set of Survey Drones (Move 4, Explore 2, Upgrade).

SpaceCorp held its annual meeting in its new headquarters on Luna. Investors were not pleased with the results thus far. Although SpaceCorp had remained profitable, it seemed like it had lost some of its ambition. The press suggested that a major sell-off could happen if there was not a major announcement. SpaceCorp announced that it would be focusing on incorporating the new Open Gas Core Nuclear Booster technology to allow it to explore the moons of Uranus, with Titania and Oberon as the first targets. The Uranian moons would be a jumping off point for exploration of the Oort cloud, and potential interstellar exploration. SpaceCorp’s investors gave management leeway to pursue the strategy, but stressed the importance of tangible profits as a result.

With the strategy set, SpaceCorp prepared to venture forward into the unknown.

Space Corp: First Play (Part Two)

The board at the beginning of turn six.

Turns 6-10

Dynamic Synergistics began an attempt to establish itself as a monopsony in the market for space equipment, purchasing Construction Rovers, Solid Nuclear Drives, and Chemical Drives. (Offer 1, 2, 3 profit on yellow). The market moved from exploration to construction, as a Heavy Lifter (Move 2 Build 2) and two Processors (Produce 1 Build 2) entered the market. Meanwhile, on Solar Lagrange Point 2, a team of SpaceCorp engineers constructed a spaceport out of a discarded cargo pod and service survey module to enable exploration of Mars and the asteroid belt. SpaceCorp R&D developed advance Salvage techniques, which could increase profitability. (Draw Salvage Card, P1 Edge: +1 Profit, take all “Start” cards from offer set).

Dynamic Synergistics continued its buying spree, this time snapping up all available processors. (Offers 1, 3, +2 Profit). The market shifted its focus to Solid Nuclear Drives and Excavators. SpaceCorp upgraded its infrastructure, deploying Solid Nuclear Drives to allow for teams to travel from the Solar Lagrange Point 2 Spaceport, dubbed Tosche Station, to Mars. The engineering team remaining on earth relocated to Tosche Station, no doubt to pick up some power converters, and they brought along a new survey module. (Draw Survey Module Explore 1, Build 1, upgrade).

The China National Space Administration (CNSA) continued its efforts to explore Deimos, locating available water and constructing an industrial base on the moon. (+1 Profit). The CNSA then sent an additional team from Deimos to North Mars, hoping to beat SpaceCorp to the punch in establishing a Mars base. SpaceCorp sent its own team of engineers from Tosche Station to South Mars, planning to race the CNSA. SpaceCorp acquired a heavy lifter to assist in its construction efforts.

Dynamic Synergistics cannot be stopped in its efforts to purchase space-related technologies, even if it has yet to launch a successful craft. They purchased the Solid Nuclear Drive, Excavators, and Build Modules available on the market, and raked in a tidy profit reselling them to other companies. (Offers 1, 2, 4, +2 profit). The market for space related goods shifted from exploration to research, as two Genome Accelerators (Research 2, Genetics 1) entered the market. SpaceCorp continued its plans to explore South Mars by investing in upgrading its infrastructure with survey modules. Planning to exploit resources on Mars, SpaceCorp Acquisitions purchased a Core Driller (Produce 1, Explore 2).

The CNSA was still pushing to compete with SpaceCorp, and moved its own team of Engineers to South Mars, hoping to discover and exploit any resources there before SpaceCorp could find them. Unfortunately for the CNSA, SpaceCorp launched an exploratory mission on Mars’s Southern Hemisphere, and identified Exotic Elements, which both provided immediate profit (+2) and promised to be productive in the future (P1). Bases would be more expensive here, however, as exotic elements proved to be a radiation hazard. SpaceCorp’s team started laying the ground work for a base on the tile, while SpaceCorp Acquisitions purchased another Core Driller, hoping to exploit the Martian elements.

[I intended to get a picture of the board at this point, but I failed to do so. I was really excited about getting my Mars base built, and just kept pushing onwards. For reference, the current score is Competition: 8 profit, SpaceCorp: 2 profit. There is a Competition industrial base on Deimos, and SpaceCorp bases on Luna (Refinery) and Solar Lagrange Point 2 (SpacePort). Competition teams are on Luna, Lunar Lagrange Point 5, Deimos, North Mars, and South Mars. SpaceCorp’s infrastructure is Default Research 2, Default Move 1, Solid Nuclear Drive (Move 2, Explore 1), Survey Module (Explore 1 Build 1). No contracts have currently been fulfilled.]

Turns 11-15

The CNSA, not satisfied to let SpaceCorp claim Mars, explored Mars’s Northern Hemisphere, discovering Water. (+1 Profit). Meanwhile, Dynamic Synergistics began efforts to fulfill an infrastructure contract. (Cube to contract 6). SpaceCorp finally implemented its Salvage protocols (+1 Profit), and embarked on a Research, Development, and Acquisition campaign, acquiring a Heavy Lifter from the market and developing an new build module.

Dynamic Synergistics, continues its acquisition efforts, profiting by speculating on the market for surveying equipment. (Offers 3, 4, +1 Profit). The exisiting Survey Pod and Genome Accelerator on the market were replaced by a Solid Nuclear Drive and a Build Module. SpaceCorp quickly swooped in to acquire the build module, and through additional “market research” determined how to disrupt the operations of the competition. (Research, Take Build Module from Market, draw Intercept).

Dynamic Synergistics, having acquired a large percentage of the market’s production of space faring equipment, finally launched a successful mission, placing a team on Sisyphus, an asteroid in near earth orbit. SpaceCorp put Project Intercept into effect, allowing it to steal a march on its competition. (Play Intercept edge card, take an additional turn after this one). SpaceCorp began a massive construction effort, using a team of Heavy Lifters and Build Modules, building a refinery to take advantage of the Exotic Elements on South Mars. This construction fulfilled the first Mars Base contract. (+3 Profit). SpaceCorp R&D developed a new survey pod.

After the successful completion of the South Mars base, SpaceCorp began to produce Exotic Elements using Core Drillers. (+2 Profit). This fulfilled the first production contract. (+2 Profit; SpaceCorp now at 10 Profit, Competition at 9).

Dynamic Synergistics’ subsidiary, Synergistic Dynamics, started bulk purchasing survey equipment from the market. (Offers 1, 3, 4, +2 Profit). SpaceCorp continued its core drilling campaign, continuing to exploit Mars’s resources. (+2 Profit).

A new competitor, Strategic Space Survey and Mining (3S&M), announced its presence by launching a team to Lunar Lagrange Point 4, intending to build a Spaceport for launches in the near solar system. SpaceCorp focused on its infrastructure, adding Chemical Drives to help assist in transport of Exotic Elements. (Play Chemical Drive upgrade, fulfill contract +2 Profit).

[Deck exhausted, so there is one final turn for SpaceCorp.]

SpaceCorp, sensing that the next big thing in space exploration would be exploitation of resources beyond the Asteroid Belt, sent its South Mars team on an advance mission to the Asteroid Belt, identifying potential cites for bases. (Take First Beyond marker).

End of the Mariners Era

With the exploitation of the near solar system complete, SpaceCorp and its Competition turned their attention to the outer solar system. SpaceCorp’s lucrative South Mars refinery continued to produce valuable elements well into the new era. (Keep Exotic Artifacts and Refinery as legacy production).

Thanks to SpaceCorp’s asteroid belt team, SpaceCorp has already identified a suitable location for development. The asteroid Ceres turns out to be another substantial source of exotic elements, furthering SpaceCorp’s grip on the exotic element extraction industry. (Discover an E1 tile that has me draw an E2 tile. E2 tile is Exotic Elements, +2 Profit, P1).

SpaceCorp stands strong, preparing efforts to extend beyond the inner solar system.

The full spread of Planeteers.
Contract display at the beginning of Planeteers.
SpaceCorp player board and hand at the beginning of Planeteers.
The map at the beginning of Planeteers.